What to Use to Clean Hardwood Floors? 3 Safe Solutions & 5 Costly Mistakes
Your beautiful hardwood floors have lost their luster. No matter how much you mop, they look streaky, dull, or worse—you’re left worrying that you’re slowly damaging one of your home’s most valuable features.
The problem isn’t your effort; it’s the overwhelming confusion over what to use to clean hardwood floor safely and effectively.
Many homeowners wonder what to use to clean hardwood floor effectively to bring back its shine.
Table of Contents
Many resources discuss what to use to clean hardwood floor and how to maintain it.
Understanding what to use to clean hardwood floor is essential for its maintenance.
Choosing what to use to clean hardwood floor makes a noticeable difference in the appearance.
You’re not alone in this. For homeowners across the USA, maintaining hardwood is a common challenge. But here’s the good news: achieving a safe, sparkling clean doesn’t require magic or expensive products. It requires the right knowledge.
The right product is crucial when considering what to use to clean hardwood floor without damage.
Learn what to use to clean hardwood floor effectively and avoid common mistakes.
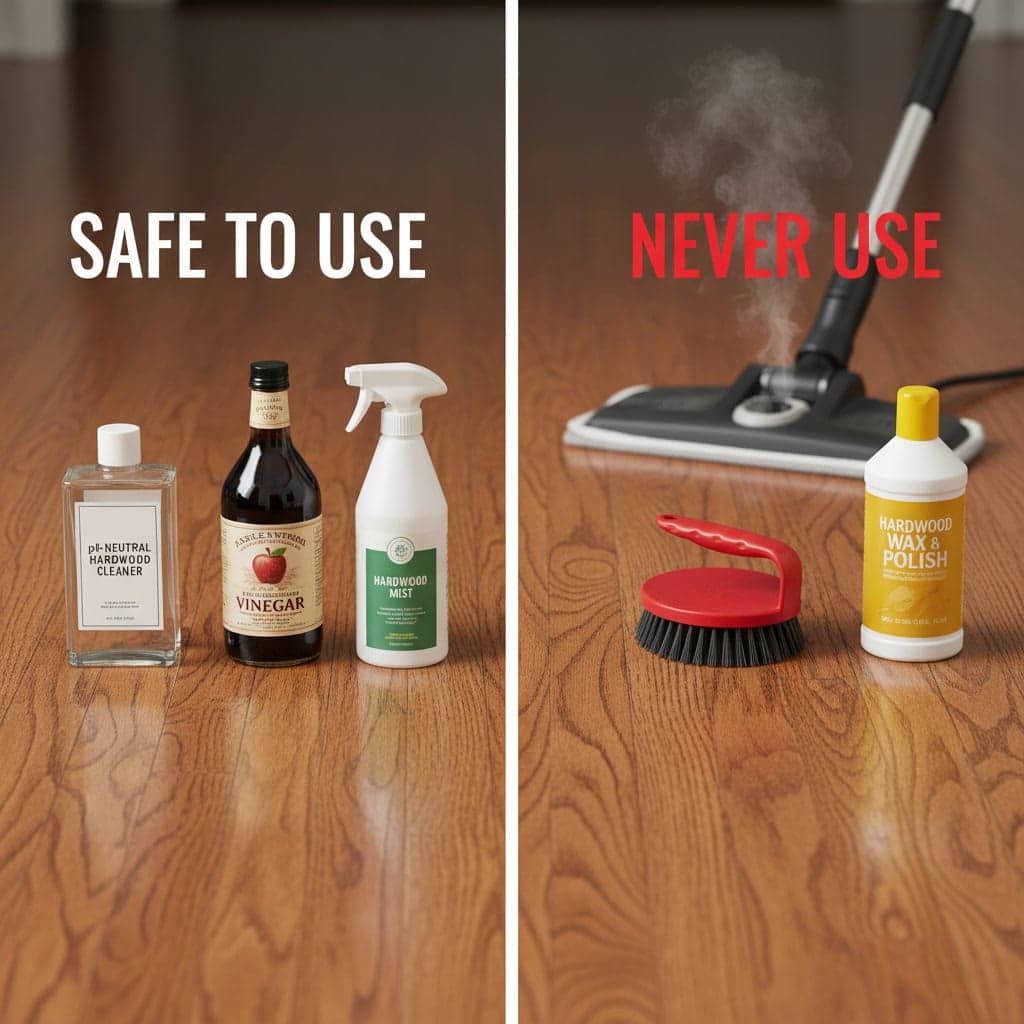
What to Use to Clean Hardwood Floor: The Essential Safe Cleaners
pH-Neutral, Hardwood-Specific Commercial Cleaners
Think of these as the Goldilocks-approved cleaners for your floors—not too acidic, not too alkaline, but just right. While DIY solutions can work, a pH-neutral, hardwood-specific commercial cleaner is often the safest, most reliable bet for routine cleaning.
Always check what to use to clean hardwood floor to preserve its finish and beauty.
Why “pH-Neutral” Matters for Your Floors
The pH scale measures acidity and alkalinity. A high pH (alkaline) cleaner, like ammonia or some all-purpose cleaners, can dull and degrade your floor’s protective polyurethane or wax finish over time.
Experts often stress the importance of knowing what to use to clean hardwood floor correctly.
It’s beneficial to educate yourself on what to use to clean hardwood floor effectively.
How to Spot the Best Bottle on the Shelf
When shopping, don’t just grab any floor cleaner. Look for these keywords on the label:
- “For Hardwood Floors” or “Safe for Hardwood”: This is non-negotiable. Don’t use products meant for laminate, vinyl, or tile.
- “pH-Balanced” or “pH-Neutral”: This is your key indicator of safety.
- “No Wax” or “No Residue”: You don’t want a product that leaves a filmy buildup, which attracts more dirt and creates a slippery surface.
Pro Application Tip: Always follow the dilution instructions on the bottle precisely. More is not better.
Pour the recommended amount into a bucket of clean water for a damp mop. A trusted source like the National Wood Flooring Association (NWFA) consistently recommends using manufacturer-approved, pH-neutral cleaners to preserve your floor’s longevity and beauty.
The Champion DIY Solution: Vinegar & Water (Debunked & Done Right)
The vinegar and water solution is the internet’s most famous—and most controversial—hardwood floor hack. You’ll find staunch defenders and vocal critics. So, what’s the truth? Used incorrectly, it can absolutely harm your floors.
The ONLY Safe Dilution Ratio to Follow
Forget the random Pinterest pins. To safely clean sealed hardwood floors, follow this expert-backed formula:
- ½ cup of white distilled vinegar
- 1 gallon of warm water
This creates a solution with a very mild acidity that’s effective for cutting through light grime and leaving a streak-free shine without residue. Crucial Reminder:
How to Use It Safely & When to Avoid It
- Sparingly is Key: Use this mix only for a periodic deep clean (e.g., once a month or seasonally), not for regular maintenance.
- The Damp Mop Rule is Non-Negotiable: Dip your microfiber mop, then wring it out until it feels barely damp to the touch. You should see no dripping water.
- Follow with a Rinse? For extra caution, some pros recommend going over the floor with a mop dampened with clean water only to remove any trace cleaner, then drying thoroughly.
- When to Skip It Altogether: Avoid vinegar solutions if your floors are old, have an unknown finish, are visibly worn, or are made of a sensitive wood like oak (which can react with acetic acid). When in doubt, stick with a pH-neutral commercial cleaner.
Read More About How to Sanitize Floors
Simple Castile Soap & Water Mix
With the right tips on what to use to clean hardwood floor, anyone can achieve sparkling results.
For those seeking a gentle, natural, and effective middle ground between commercial bottles and vinegar, a Simple Castile Soap & Water Mix is a superstar DIY solution.
Castile soap, made from plant oils like olive or coconut, is biodegradable, non-toxic, and free from the synthetic detergents and harsh chemicals found in many all-purpose cleaners. It cleans by lifting away dirt and grease without stripping your floor’s finish, leaving behind a gentle, fresh scent.
The Foolproof Recipe for Sparkling Floors
This mix is about a hint of soap, not a bubble bath for your floors.
- Fill a large bucket with 1 gallon of warm water.
- Add only 1-2 teaspoons of liquid castile soap (like Dr. Bronner’s). Start with less—you can always add a touch more if needed.
- Swirl gently to mix. You should see minimal suds.
Application Tips for a Perfect, Residue-Free Clean
- The Golden Rule: Your mop must be well-wrung. After dipping, wring it out thoroughly until it’s just damp. Soap residue left on the floor attracts more dirt.
- Work in Sections: Clean a small area (e.g., a 4×4 foot section), then immediately go over the same area with a mop rinsed in clean water and wrung out well. This “rinse pass” is crucial to pick up any lingering soap and prevent haze.
- Dry Promptly: Follow up by buffing the area dry with a clean, soft microfiber cloth to prevent any moisture from seeping in and to ensure a streak-free shine.
What NOT to Use on Your Hardwood Floors
The Dangers of Common Household Cleaners
Here’s a breakdown of what to keep far away from your hardwood:
1. Steam Mops: The Silent Floor Killer
While fantastic for tile, steam mops are a hardwood floor’s worst enemy. They force high-temperature moisture down into the microscopic seams and cracks of your flooring.
This can cause the wood to swell, warp, and permanently damage the boards and the finish. The NWFA explicitly warns against the use of steam cleaners on wood floors for this reason.
2. Abrasive Cleaners & Scrubbing Tools
- Powdered Cleansers & Scrubbing Pads: Products labeled “scrubbing” or “with bleach power” are designed to scour surfaces. They will microscratch and dull the protective polyurethane layer, making your floor look permanently faded and worn.
- Magic Erasers (Melamine Foam): These are essentially ultra-fine sandpaper. They will absolutely strip away the finish, leaving a dull, damaged spot.
Understanding what to use to clean hardwood floor helps in preventing long-term damage.
When you know what to use to clean hardwood floor, it becomes easier to maintain.
3. Ammonia, Bleach, & Harsh Chemicals
- Ammonia-Based Glass Cleaners & All-Purpose Cleaners: These are highly alkaline and will break down the floor’s sealant over time, leading to yellowing, cloudiness, and loss of protection.
- Bleach or Cleaners with Bleach: These will discolor and stain the wood itself, not just the finish.
- Furniture Polish or Silicone-Based Sprays: These create a slippery, residue-prone surface that attracts dirt and makes future proper cleaning difficult.
4. The “Water-Only” Overload
Even plain water is dangerous if over-applied. Using a sopping-wet mop or letting water puddle allows liquid to seep between planks. This can cause cupping (edges rise higher than the center), warping, and eventually, mold growth in the subfloor.
Why Water is a Double-Edged Sword
Water is the most basic cleaning agent, but for hardwood floors, it’s a classic case of “too much of a good thing.” Used correctly, a barely-damp mop is safe and effective.
The Core Problem: Wood is Hygroscopic
This simply means wood naturally absorbs and releases moisture from the air. A sealed finish (polyurethane, etc.) acts as a protective barrier to slow this process.
The Visible Damage Caused by Water
Using too much water doesn’t just create streaks. Look for these warning signs:
- Cupping: The edges of the boards become higher than the center, creating a concave shape. This happens when the bottom of the board absorbs more moisture than the top.
- Warping: Boards twist or bend out of plane.
- Crowning: The center of the board becomes higher than the edges (often seen after a cupped floor dries from the top first).
- Finish Failure: Cloudy white spots or peeling finish where water has penetrated and broken the seal.
The Right Technique to Stay Safe
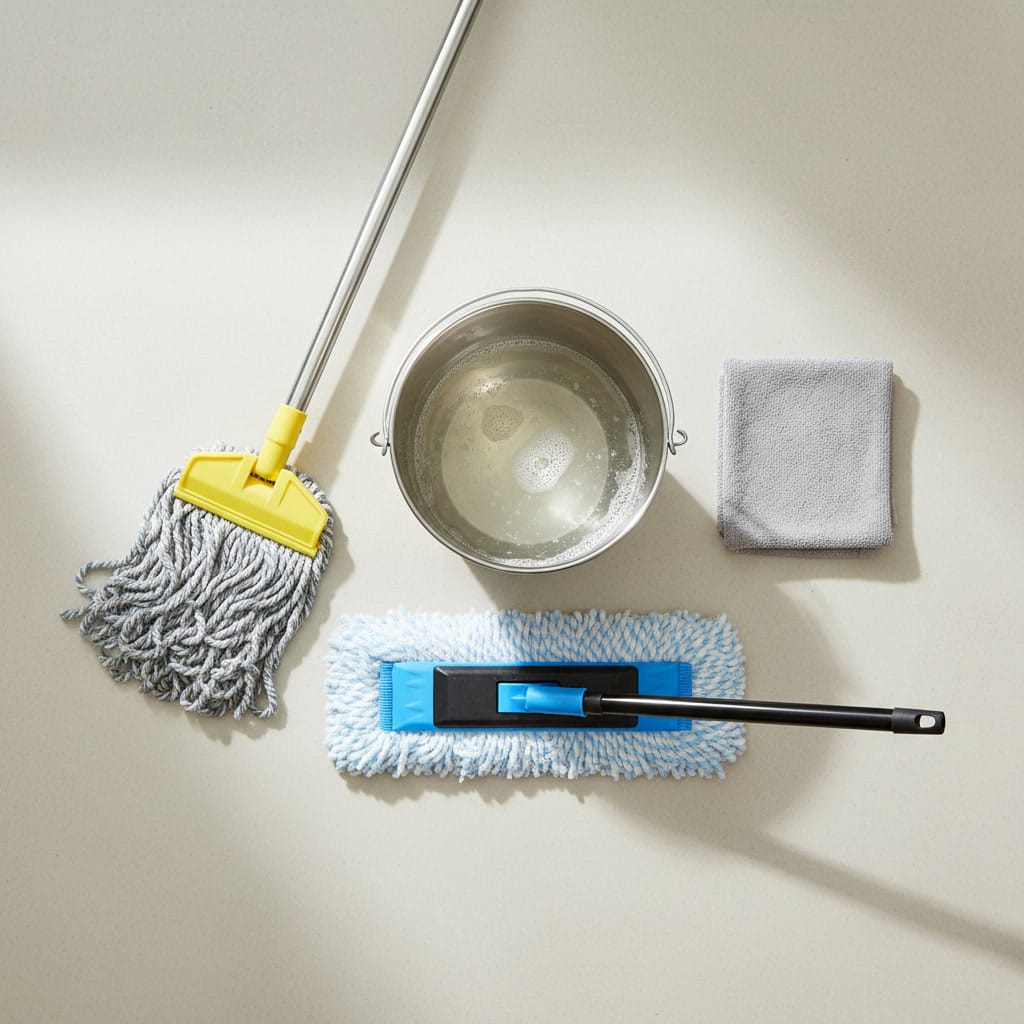
- Use a Flat-Weave Microfiber Mop: It holds the ideal amount of moisture without dripping.
- The Two-Bucket Method (Pro-Tip): Use one bucket for your cleaning solution and a second with clean rinse water. Dip and wring the mop in the cleaner, clean a section, then rinse and wring the mop in the clean water bucket before reloading with cleaner. This prevents spreading dirty water.
- Work Fast & Dry As You Go: Never let moisture sit. Clean in small sections (3×3 feet) and immediately buff dry with a clean, absorbent towel, especially near seams and edges.
Step-by-Step: How to Clean Your Hardwood Floors Properly
Step 1: Dry Dusting is Non-Negotiable
The Best Tools for the Job
Forget the broom. Opt for tools that trap and hold dust instead of sending it airborne.
- Microfiber Dust Mop (The Gold Standard): A flat, static-charged microfiber pad attracts and locks in dust and hair like a magnet. It’s lightweight, covers large areas quickly, and can be tossed in the wash.
- Vacuum with a Bare Floor Setting: Use a canister or upright vacuum with a soft-bristle brush attachment or a setting that turns off the rotating brush/beater bar. The hard floor setting ensures the vacuum suctions up debris without the agitator scratching the surface.
- Soft Bristle Broom: If it’s your only option, use one with fine, flagged tips (split ends) designed for hard floors to help capture more dust.
How to Dry Dust Like a Pro
- Clear the Area: Pick up small rugs, toys, and other obstacles.
- Work with the Grain: Gently push your dust mop or vacuum attachment along the direction of the wood planks. This helps guide debris out of the grooves.
- Overlap Strokes: Slightly overlap each pass to ensure you don’t miss a strip.
- Clean Your Tool: Shake out or wash the microfiber pad after each use. Empty the vacuum canister to maintain strong suction.
Step 2: Mixing & Applying Your Cleaner
With your floor free of abrasive grit, it’s time to prepare your cleaning solution. This step is all about precision and restraint.
The Mantra: Dilution is Key
Whether you’re using a commercial pH-neutral cleaner or a DIY castile soap mix, always follow dilution instructions to the letter. More cleaner does not mean more cleaning power—it means more residue left behind that will attract dirt and dull your floor.
Mixing Your Solution
- Use a Clean Bucket: Always start with a bucket free of old cleaner or debris.
- Add Warm Water First: Fill your bucket with the required amount of warm water (not hot). Warm water helps the solution activate and dissolve grime more effectively than cold.
- Add Your Cleaner: Pour in the precise amount of your chosen hardwood floor cleaner.
- Gentle Swirl: Give it a gentle swirl with your hand or the mop handle to mix. Avoid vigorous stirring that creates excessive suds.
The Critical Application Rule: The “Barely Damp” Mop
This is the most important technique to master. Your mop must be damp, not wet.
- Submerge & Soak: Dip your microfiber mop head or pad into the solution, allowing it to become saturated.
- The Ultimate Wring: This is non-negotiable. Wring out the mop head completely using the bucket’s wringer or by hand over the bucket. Wring it until you cannot squeeze out another drop. The mop should feel only slightly damp to the touch—you should be able to press it against your cheek without feeling a cold, wet sensation.
- Test on a Small Area First: If you’re trying a new cleaner, apply it to a small, inconspicuous area (like in a closet or corner) and let it dry completely. Check for any cloudiness or residue before cleaning the entire floor.
Step 3: The Right Mopping Technique
The Systematic Approach: Section by Section
Don’t just wander. Treat your floor like a grid and clean in manageable, 3×3 foot sections. This allows you to control your work area and, most importantly, prevent the cleaner from drying on the floor, which is a primary cause of streaks and residue.
- Start in a corner farthest from your exit.
- Apply your barely-damp mop to the first section.
The Golden Rule: No Standing Liquid
Your goal is to leave a thin, even dampness that will air-dry quickly.
Never let pools or streaks of cleaner sit on the surface. If you see any, immediately go over the area with your well-wrung mop to pick up the excess moisture, or use a dry microfiber towel to blot it up. Standing liquid is the fastest path to water damage.
Step 4: Drying & Buffing for Shine
Why Immediate Drying is Critical
Even the most well-wrung mop leaves behind a microscopic layer of moisture. Letting this air-dry on its own, especially in humid conditions or without airflow, can lead to water spots and can allow the minimal moisture to slowly evaporate, potentially leaving behind any dissolved minerals or traces of cleaner as a dulling residue.
How to Dry and Buff for a Professional Finish
- The Right Tool: Keep a clean, dry, and soft microfiber towel or a separate dry microfiber mop pad handy.
- Work Behind Your Mop: As you finish mopping each 3×3 foot section, immediately follow up with your dry towel.
- The Buffing Motion: Fold the towel and use a gentle, circular or straight-line buffing motion (with the grain) to dry the surface. Apply light pressure. You’re not just drying; you’re polishing the finish. This friction removes the finest streaks and brings up the shine.
- Check Your Work: Angle yourself to see the floor’s reflection in the light. If you see any streaks, give that spot another pass with the dry towel.
Pro-Tips for a Flawless Finish
- Increase Airflow: After buffing, open windows or turn on a ceiling fan to encourage rapid, even air drying across the entire floor.
- Wait Before Walking: Allow at least 15-30 minutes for the floor to dry completely before walking on it in socks or bare feet. Wait a full hour before replacing rugs or furniture to prevent trapping any residual moisture.
- The Final Inspection: Once dry, do a visual and touch inspection. The floor should feel smooth, not tacky, and look uniformly shiny under the light.
This final step ensures your floor is not just clean, but also protected and radiant. It locks in the results of your hard work, leaving you with a spotless, streak-free surface that truly shines.
Pro Tips for Lasting Hardwood Floor Beauty
Preventative Measures (Felt Pads, Rugs, Trimming Pet Nails)
The best way to clean your hardwood floors is to prevent them from getting dirty and damaged in the first place. A proactive defense strategy minimizes scratches, dents, and grit, drastically reducing the frequency and intensity of deep cleans needed. These simple habits are your daily armor.
1. Felt Pads: The Unsung Heroes
Attach high-quality, self-adhesive felt pads to the bottom of all furniture legs—chairs, tables, sofas, and cabinets. Not just the living room, but everywhere.
- Why: They prevent scratches and gouges when furniture is moved (even slightly from daily use) and protect against the crushing weight that can dent the wood.
2. Strategic Rug Placement
Use rugs and mats as your first line of defense in high-traffic zones and entry points.
- Entry Mats (Inside & Out): Place coarse mats outside doors to scrape off debris and high-quality, non-slip rug pads with breathable backings inside all exterior doors. This traps the majority of dirt, sand, and moisture before it ever touches your hardwood.
3. Pet Nail Maintenance
Your furry friend’s claws are like tiny chisels. Keeping your pet’s nails trimmed is one of the most effective ways to prevent fine, widespread scratching across your floors.
- The Sound Test: If you hear a constant “click-click-click” as they walk, it’s time for a trim.
- Proactive Protection: Consider placing soft rugs in their favorite pathways or resting areas for added cushioning.
Dealing with Specific Issues: Scuffs, Spots, and Dull Areas
Even with perfect preventative care, everyday life leaves its mark. Instead of panicking over a scuff or a dull patch, use these targeted solutions. The key is to address issues gently and specifically, avoiding harsh all-over treatments for small, localized problems.
1. Black Heel Scuffs or Light Scratches
These are often marks on the finish, not deep scratches in the wood.
- The Magic Eraser (Use with Extreme Caution): Dampen a melamine foam pad (Magic Eraser) very slightly and wring it out completely. Gently test on an inconspicuous spot first. Then, with very light pressure, rub only the scuff mark (not the surrounding finish) in the direction of the grain. Stop immediately once the mark is gone. Do not use on waxed floors.
- Gentle Abrasive Method: Apply a tiny bit of baking soda on a soft, damp cloth to form a mild paste. Gently buff the scuff. Wipe clean with a damp cloth and dry immediately.
- Prevention: The felt pads mentioned earlier are your best defense against furniture-related scuffs.
2. Water Spots & White Haze
These are often moisture trapped under the finish.
- The Blow-Dryer Trick: Set a hairdryer on low heat and hold it several inches away from the spot. Gently warm the area while buffing it with a soft microfiber cloth. The heat can help evaporate the trapped moisture. Do not overheat or concentrate heat in one spot for too long.
- The Mayonnaise or Olive Oil Hack (Temporary Fix): For very minor, superficial haze, apply a tiny dab of mayonnaise or olive oil to the spot with a cloth. Let it sit for 10-15 minutes to allow the oils to penetrate slightly, then buff off completely. This can mask the spot by filling micro-gaps but is not a permanent repair.
3. Dull Areas in High-Traffic Zones
When a specific area loses its luster while the rest of the floor is fine, it’s often due to micro-scratches and worn finish.
- Deep Clean First: Ensure the area isn’t just dirty. Give it a careful clean with your pH-neutral solution.
- Consider a Hardwood Floor Reviver/Polisher: These are not finishes, but acrylic-based products designed to fill in tiny scratches and temporarily restore shine to worn areas. They are not a permanent fix and will need reapplication. Always test in a closet first and follow the product instructions meticulously.
- Know When to Call a Pro: If a large area is dull, scratched, or damaged, the true solution may be a professional screen-and-recoat (a light sanding and new topcoat of finish). This is a job for a certified hardwood floor professional.
Important Note: For any oil, wax, or polish-based remedy, understand that it may complicate future professional refinishing.
For serious or widespread damage, consulting a resource like the National Wood Flooring Association’s (NWFA) consumer resources to find a certified professional is always the safest long-term investment.
Conclusion
So, what’s the final answer to what to use to clean hardwood floor? It boils down to this: gentleness, precision, and prevention.
You now have the toolkit—from pH-neutral commercial cleaners and the perfectly diluted DIY castile soap mix to the critical knowledge of what to never use, like steam mops and harsh chemicals.
By following these steps, you’re not just cleaning; you’re actively preserving the beauty and value of your investment for years to come. No more guesswork, no more fear of causing damage—just confidence that you’re doing right by your floors.
We’d love to hear from you! Which cleaning hack are you most excited to try—the castile soap mix, the vinegar solution done right, or simply mastering the dry-dusting habit? Share your plans or questions in the comments below!
For more trusted tips to simplify your home care, [Subscribe to our newsletter] for weekly cleaning hacks delivered straight to your inbox.
What is the best thing to clean hardwood floors with?
The safest and most reliable option is a pH-neutral, hardwood-specific commercial cleaner, as it’s formulated to clean effectively without damaging the sealant. For a natural DIY option, a simple mix of 1-2 teaspoons of liquid castile soap in 1 gallon of warm water is an excellent gentle cleaner. Remember, the tool (a well-wrung microfiber mop) is just as important as the cleaner.
Why are my hardwood floors still streaky and dull after I mop?
Streaks and dullness are usually caused by too much cleaner or moisture, or by mopping over undusted grit. Ensure you: 1) Dry dust thoroughly first, 2) Use the correct dilution of cleaner, 3) Wring your mop until it’s only damp, and 4) Buff the floor dry with a clean microfiber towel immediately after mopping. Residue from harsh or waxy cleaners can also cause buildup.
Can I use vinegar to clean my hardwood floors?
Yes, but only if done correctly. Use a highly diluted solution of ½ cup white vinegar per 1 gallon of warm water, and ensure your mop is wrung out until it’s only barely damp. This mild solution is safe for occasional deep cleans on sealed floors but should not be used daily, as overuse can degrade the finish over time. Never use it on unsealed, waxed, or worn floors.
So, next time you think about what to use to clean hardwood floor, remember these suggestions.
Refer back to this guide on what to use to clean hardwood floor for best practices.
Join the conversation about what to use to clean hardwood floor and share your experiences.
For more tips on what to use to clean hardwood floor, subscribe to our newsletter.
Ask yourself what to use to clean hardwood floor before trying new methods.
Finally, knowing what to use to clean hardwood floor is an essential skill for homeowners.
Ultimately, what to use to clean hardwood floor is a question that all homeowners should think about.