
Sticky Floor Syndrome? Here’s How to Get Rid of Sticky Floors After Mopping for Good
A brief, relatable opener acknowledging the reader’s frustration with sticky, tacky floors post-mopping. State the promise: this guide will explain why it happens and provide actionable, immediate solutions.
Table of Contents
The good news? Fixing (and preventing) sticky floors is easier than you think. In this guide, we’ll break down the simple how to get rid of sticky floors after mopping and give you five fast, effective hacks to restore that smooth, clean feel for good. Let’s get your floors from tacky to truly clean.
Why Are My Floors Sticky After Mopping? (The Root Causes)
Explain the science simply. This builds trust and helps the reader prevent the issue in the future. Use short paragraphs.
Cleaner Residue Buildup
Think of this as the “too much of a good thing” problem. That fresh, fragrant floor cleaner you love? If you’re not careful, it’s likely leaving behind a secret sticky layer.
Here’s what happens: Most cleaners contain surfactants and emulsifiers—the agents that lift dirt and grease. To work effectively, they need to be fully rinsed away.
When you use too much product or skip the rinse step, these agents dry into a thin, polymer-like film on your floor.
Dirty Mop Water
This culprit is all about a simple but costly mistake: not changing your water often enough. It’s tempting to mop the entire house with one bucket, but this is a classic shortcut that leads directly to sticky floors.
As you continue to dip your mop back into that same bucket and move to the living room or hallway, you’re no longer cleaning with fresh solution.
You’re essentially painting a thin, diluted layer of dirt and soap scum across your entire floor. This mixture dries into a uniform, sticky film.
The Simple Fix: Practice “zone cleaning.” Change your mop water (both the cleaning solution and the rinse water) after every one or two large rooms, or anytime the water looks cloudy. For best results, use a two-bucket system: one for soapy water and one for clean rinse water. This ensures you’re always applying a clean solution and not just spreading yesterday’s dirt.
Using the Wrong Cleaner for Your Floor Type
The most common mistake is using a product designed to add a protective layer, like a wax-based polish or a “shine-enhancing” cleaner, on floors that don’t need or can’t absorb it. For example:
- On Vinyl or Laminate: These floors have a protective wear layer. A wax-based cleaner builds up on top of it, creating a gummy, slick film.
- On Sealed Hardwood or Tile: Many “all-purpose” cleaners contain oils or polymers that can leave a hazy, tacky residue on sealed surfaces, dulling their natural shine.
- The “One Cleaner Fits All” Myth: An aggressive cleaner meant for greasy garage concrete will be far too harsh and soapy for your living room laminate, guaranteeing a sticky aftermath.
The Simple Fix: Always check the manufacturer’s cleaning guidelines for your specific flooring. When in doubt, opt for a pH-neutral, no-rinse (or easily rinsable) cleaner specifically labeled for your floor type.
Hard Water Issues
Here’s the science: When you mop with hard water, the soap or detergent reacts with the minerals to form a sticky, insoluble substance called “soap scum” (the same film you see on shower doors).
As the water evaporates, those dissolved minerals are also left behind on your floor as a thin, crusty, or gritty film. This residue can feel sticky, look cloudy, and make your floors dull no matter how much you clean.
The Simple Fix: For mopping, you have two effective strategies. First, you can use distilled white vinegar in your rinse water (as outlined in Hack #1). The mild acid in vinegar helps dissolve and neutralize the mineral deposits.
How to Get Rid of Sticky Floors After Mopping: 5 Fix-It Hacks

The core solution section, optimized for the focus keyword. Present each method as a clear, numbered hack.
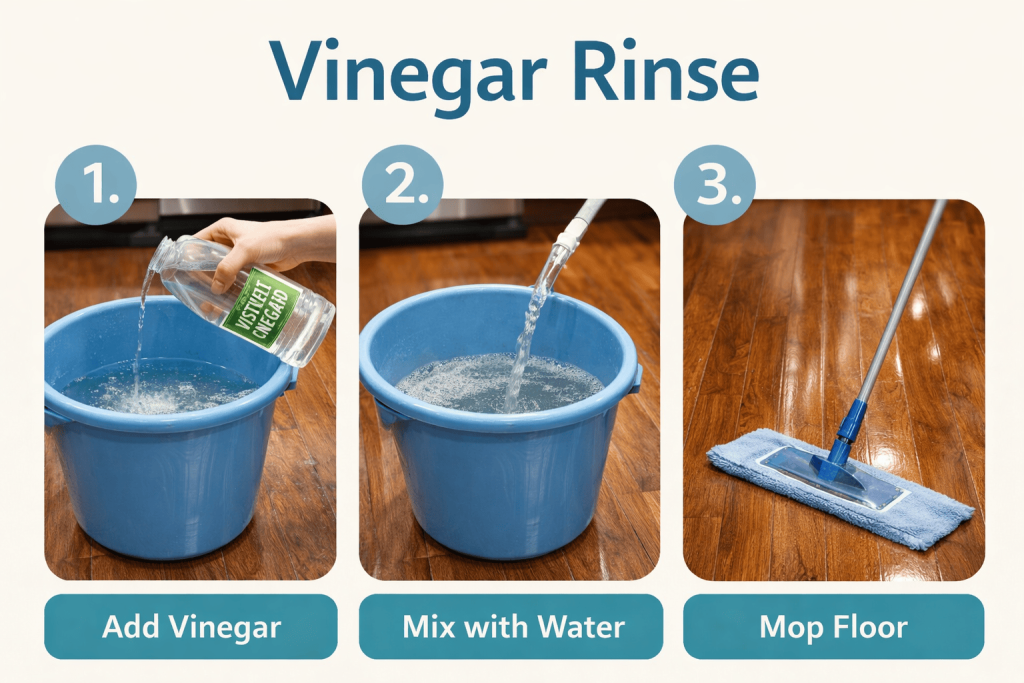
Hack #1: The Vinegar & Hot Water Rinse (The Residue Remover)
White vinegar is a mild acid that breaks down the alkaline bonds in soap scum and mineral deposits, while hot water helps dissolve and lift the grime away.
What You’ll Need:
- White distilled vinegar
- Hot water (as hot as is safe for your floor type)
- A clean bucket
- A clean mop (preferably microfiber)
The Simple Steps:
- Mix the Solution: Fill your bucket with 1 gallon of hot water. Add 1/4 cup of white distilled vinegar. This mild ratio is powerful enough to cut residue but safe for most sealed floors, including tile, vinyl, and laminate. (Avoid on unsealed wood or stone unless confirmed safe.)
- Mop & Dissolve: Dip your mop in the solution, wring it out well so it’s damp, not soaking. Mop your sticky floor thoroughly. The vinegar will immediately start working to dissolve the sticky film. You don’t need to scrub—let the solution do the work.
- The Key Move – Don’t Let It Air Dry: This is crucial. For best results, after mopping a section with the vinegar solution, go over the same area with a mop rinsed in plain hot water or a fresh, damp microfiber cloth to rinse away the dissolved residue. Alternatively, you can change your solution to plain hot water for a final whole-floor rinse.
Hack #2: The Clear Water “Final Pass” Method
Sometimes, the simplest solution is the most powerful. This hack is less about a special ingredient and more about perfecting your technique.
What You’ll Need:
- Hot, clean water
- A second clean bucket (or a sink for refilling)
- A clean mop head or microfiber pad
The Simple Steps:
- Complete Your Normal Mopping: First, mop your floor as you usually would with your preferred cleaner. This lifts the dirt and grime.
- Empty, Rinse, and Refill: Here’s the critical pivot. Dump out all the dirty soapy water. Rinse your bucket and mop head thoroughly to remove any soap suds or debris. Refill the bucket with fresh, hot water only—no cleaner added.
- Execute the “Final Pass”: Go back over the entire floor you just mopped, using only the clear hot water. Use the same motion, but focus on lifting away the leftover soapy film. You’ll likely see slight cloudiness on your mop head—that’s the residue being removed!
- Change Water Frequently: For large areas, don’t try to rinse the whole house with one bucket. Change the rinse water whenever it becomes warm, cloudy, or sudsy. Fresh water is key.
Hack #3: The Ammonia Solution for Tough Grime (Use with Caution)
- VENTILATE: Open windows and turn on fans. Ammonia fumes are strong.
- NEVER MIX: Under any circumstances, do not mix ammonia with bleach, vinegar, or products containing chlorine. This creates a toxic, dangerous gas.
- PROTECT YOURSELF: Wear gloves and consider eye protection.
- CHECK COMPATIBILITY: Do a spot test in an inconspicuous area first. Avoid using on waxed floors, certain stones, or antique wood, as it can strip finishes.
What You’ll Need:
- Clear, unscented household ammonia
- Hot water
- A well-ventilated space
- Gloves and protective eyewear
- Two clean buckets
The Simple Steps:
- Mix Safely & Pre-Clean: In a well-ventilated area, add 1/2 cup of clear ammonia to 1 gallon of hot water in your bucket. For extremely tough jobs, you can use a 1:1 ratio of ammonia to water for a small, targeted area, but always start with the diluted solution. Sweep or vacuum the floor first to remove loose dirt.
- Apply & Let Dwell: Mop the solution onto the sticky floor, wringing your mop well. Do not soak the floor. For severe buildup, let the solution dwell on the surface for 5-10 minutes to break down the grime, but do not let it dry.
- Scrub if Needed: Use a stiff-bristled brush (safe for your floor type) on particularly bad spots to help lift the dissolved film.
- RINSE EXTENSIVELY: This is the most important step. Empty the ammonia bucket. Thoroughly rinse your mop and bucket. Refill with fresh, clean hot water. Mop the entire area multiple times to remove every trace of the ammonia solution. Any leftover residue will cause stickiness.
Hack #4: Dish Soap Degreasing Trick
For sticky floors caused by kitchen splatters—think cooking oil, butter, or greasy footprints—you need a degreaser. And you likely have a powerful one already under your sink: plain blue dish soap.
What You’ll Need:
- A few drops of plain blue dish soap (like Dawn or Joy)
- Hot water
- A clean bucket and mop
The Simple Steps:
- The “Drops, Not Glugs” Rule: Fill your bucket with one gallon of very hot water. Add only 3-5 drops of dish soap. Swirl to mix. You should see minimal suds. More soap does not equal more cleaning power here—it equals more residue.
- Mop to Emulsify Grease: Mop your greasy, sticky floor as normal with this dilute solution. You’ll feel the soap cutting through the tackiness. Pay extra attention to high-splash zones near the stove and sink.
- The Mandatory Double Rinse: This step is non-negotiable with dish soap.
- First Rinse: Empty the soapy water. Rinse your bucket and mop head completely.
- Second Rinse: Refill with fresh, hot water only. Mop the entire floor to rinse away all soapy residue.
- Pro Tip: If you see suds, change your rinse water and mop again until the water runs clear and suds-free.
- Dry for a Streak-Free Finish: Use a dry microfiber mop or towel to buff the floor dry and ensure no water spots are left behind.
Why It Works: This hack targets the root cause of kitchen-floor stickiness: grease. Dish soap breaks it down efficiently
Hack #5: Baking Soda Scrub for Textured Floors
This method is perfect for bathroom floors, kitchen backsplashes, or entryway tiles where dirt and sticky residue get lodged deep within the texture.
What You’ll Need:
- Baking soda
- Warm water
- A small bowl
- A soft-bristled brush (an old toothbrush or grout brush works perfectly)
- A damp cloth or mop
- Vacuum or broom (for pre-cleaning)
The Simple Steps:
- Make a Scrubbing Paste: In a small bowl, mix baking soda with just enough warm water to form a thick, spreadable paste with the consistency of toothpaste. A 3:1 ratio of baking soda to water is a good starting point.
- Apply to Problem Areas: First, sweep or vacuum the floor to remove loose debris. Using your fingers or a small spatula, spread the paste directly onto the sticky, textured areas or grout lines. Focus on spots that feel tacky or look discolored.
- Scrub Gently: Let the paste sit for 5-10 minutes to help break down the residue. Then, use your soft-bristled brush to scrub in a circular motion. The gentle grit of the baking soda will work into the texture and lift the sticky gunk without scratching most surfaces.
- Rinse Extremely Thoroughly: This is the most critical step. Use a very well-wrung damp cloth or mop to wipe away all the paste. Follow up by mopping the entire area with clean, warm water to remove any baking soda film. Any leftover residue will dry into a white, powdery film.
- Dry Completely: Buff the area dry with a clean towel to prevent water spots and ensure no particles remain in the texture.
Pro Prevention Tips: How to Never Mop a Sticky Floor Again
Shift from solution to prevention. Offer best practices.
Mop & Bucket Hygiene 101
Follow these simple rules to ensure your tools are allies, not enemies:
1. Clean Your Mop Head After Every Use:
- Microfiber Pads: Machine wash in hot water (no fabric softener) and tumble dry low or air dry.
- Sponge Mops: Rinse thoroughly under hot running water, wring out, and soak for 15 minutes in a disinfecting solution (like a bit of bleach or vinegar in water). Rinse again and air-dry completely, head-up, to prevent mildew.
- String Mops: Run through a hot wash cycle (can be with towels) or soak in hot, soapy water, rinse until water runs clear, and hang to dry fully.
2. Adopt the Two-Bucket System:
This is a game-changer. Use one bucket for your cleaning solution and a second bucket with clean, hot water for rinsing your mop.
- Process: Dip mop in cleaner, mop a section, then dunk and swish the mop in the rinse bucket to release the dirt before going back to the cleaner. This keeps your cleaning solution clean for longer.
3. Change Water Frequently, Not Just at the End:
Don’t wait for the water to look like mud. As a rule of thumb, change both your cleaning solution and rinse water after every 2-3 large rooms, or immediately if the water becomes cloudy or sudsy. Fresh water is non-negotiable.
4. Scrub and Dry Your Bucket:
After emptying, give your bucket a quick scrub with hot, soapy water to remove any filmy residue from its sides and bottom. Rinse and turn it upside down to air dry completely before storing.
The “Less is More” Cleaner Rule
Why More Cleaner Causes More Problems:
- Residue Overload: Surfactants (the cleaning agents) need to be fully rinsed. Excess product cannot be fully dissolved and rinsed away, so it dries as a sticky film.
- Attracts Dirt: That sticky residue becomes a magnet for dust, pet hair, and new grime, making your floors dirty faster.
How to Practice the “Less is More” Rule:
- Always Measure: Never just pour cleaner into your bucket. Use the cap or a measuring spoon to follow the product’s dilution instructions exactly. For most concentrates, you need far less than you think.
- Start with the Minimum Recommended Amount: If the label says “1/4 cup per gallon,” start there. You can always add a tiny bit more if needed, but you can’t take it out once it’s mixed.
- For Light Cleaning, Use Water First: For routine maintenance between deep cleans, often mopping with just hot water or a vinegar-water solution is sufficient to pick up dust and light soil without any risk of residue.
Dry Thoroughly for Instant Shine
Why Drying Makes the Difference:
- Prevents Water Spots: As leftover rinse water evaporates, any dissolved minerals or microscopic dirt particles are deposited on the surface, leaving dull spots or a faint film.
- Eliminates Streaks: Drying with a clean towel ensures a uniform finish, buffing away any last hints of solution that could dry unevenly.
- Speed & Safety: It gets your floors back in service faster and reduces slip hazards.
How to Dry Your Floors Like a Pro:
- Choose the Right Tool: A clean, dry microfiber mop or several absorbent microfiber cloths are ideal. Microfiber’s static charge grabs and holds dust and moisture without leaving lint.
- The “Follow-Up” Method: Right after your final rinse pass with clear water, don’t walk away. Immediately go back over the damp section with your dry mop or cloth. Wipe in the direction of the floorboards or tile lines.
- Buff for Brilliance: Use firm, sweeping motions. For extra shine on hard surfaces, a quick, light buff with a completely dry towel can bring up a beautiful luster.
- Air Flow is Your Friend: For faster overall drying, open windows or turn on ceiling fans to circulate air, especially in humid climates.
What NOT to Do on Common Floor Types
Laminate & Engineered Wood:
- DON’T: Use soaking wet mops, steam cleaners, or wax-based products. Excess moisture can warp the planks and sealers leave a sticky, hazy film.
- DO: Use a well-wrung damp mop and cleaners specifically labeled for laminate.
Read More About Clean Very Dirty Laminate Flooring
Traditional Hardwood (Sealed or Unsealed):
- DON’T: Use vinegar, ammonia, or all-purpose cleaners routinely on unsealed or worn hardwood, as they can damage the finish. Avoid excessive water.
- DO: Use a pH-neutral hardwood cleaner and a barely-damp mop. Always follow the manufacturer’s care instructions.
Luxury Vinyl Plank (LVP) & Tile (LVT):
- DON’T: Use abrasive scrubbers, paste wax, or solvent-based cleaners (like acetone). These can scratch or degrade the protective wear layer, leading to hazy, tacky buildup.
- DO: Clean with a mild, non-abrasive cleaner (like dish soap solution) and rinse well.
Natural Stone (Tile, Slate, Marble, Granite):
- DON’T: Use vinegar, lemon juice, or other acidic cleaners. They can etch and dull the surface permanently. Avoid abrasive brushes.
- DO: Use a pH-neutral stone cleaner and a soft mop. Always seal stone surfaces as recommended.
Conclusion
Sticky floors after mopping are a fixable problem, not a life sentence. As we’ve uncovered, that annoying tackiness almost always boils down to one thing: residue.
By starting with a simple vinegar rinse or a clear water final pass, you can banish stickiness today. Remember the golden rules: use less cleaner, change your water often, and always dry thoroughly.
Tried these hacks? Let us know which one saved your floors! Share your before-and-after story or your own secret weapon against sticky floors in the comments below. Have a friend battling the same sticky situation? Pass this guide along!
Why is my floor still sticky after I mop with just water?
If you’re using only water, the stickiness is likely from old, built-up residue from previous cleanings. You’re re-activating a film of soap, wax, or grease. To fix it, you need a residue-removing solution first. How to get rid of sticky floors after mopping in this case requires a degreaser like dish soap or a dissolving agent like vinegar in your water to cut through the old buildup, followed by a thorough rinse.
Can I use vinegar on all my floors to remove stickiness?
Most, but not all. White vinegar is safe and effective on sealed tile, vinyl, and laminate. However, avoid using vinegar on unsealed wood, natural stone (like marble or granite), or waxed floors, as the acid can damage the finish. Always check your floor manufacturer’s guidelines and do a spot test in an inconspicuous area first.
How often should I change my mop water to prevent stickiness?
Change your cleaning solution and rinse water after every 2-3 large rooms, or immediately when the water looks cloudy. Mopping with dirty water is the top cause of spreading a thin, sticky film. For large areas, the two-bucket system (one for soap, one for rinse water) is the best practice to keep your water clean longer.